Minecraft
Guides for the Minecraft-only tabs of the game panel: Versions, Modpacks, Players and the server icon and MOTD editor.
- Changing the game version and server type (Versions)
- Server icon, MOTD and basic settings
- Managing players, whitelist, ops and bans (Players)
- Installing a modpack (Modpacks)
Changing the game version and server type (Versions)
What this is about
The Versions tab is for Minecraft (Java Edition) servers. It lets you change what your server runs without touching files by hand:
- a different Minecraft version (for example 1.21.11 instead of 26.3),
- a newer or older build of your server software (Paper #244 instead of #131),
- a different server software altogether: Vanilla, Paper, Purpur, Fabric, Forge, NeoForge and many more (but see the note below: for a permanent switch, use Change Game on the billing site instead).
The panel downloads the right server file for you, puts it in place and sets the matching Java version. Your world, plugins, mods and settings stay where they are.
Before you start
- Stop the server from the Console. The Versions tab doesn't stop it for you, and swapping the server file under a running server is asking for trouble. The new version is used the next time the server starts.
- Take a backup. Minecraft upgrades your world when it first loads it in a newer version, and an older version can't open an upgraded world. If you ever want to go back, you'll restore this backup.
- Check your plugins and mods. They're built for a specific Minecraft version and server software. A big version jump, or a switch from Paper to Fabric, usually means updating or replacing them.
Subusers need the Files → update permission to install a version. Anyone who can read files can look at the list.
Reading the page
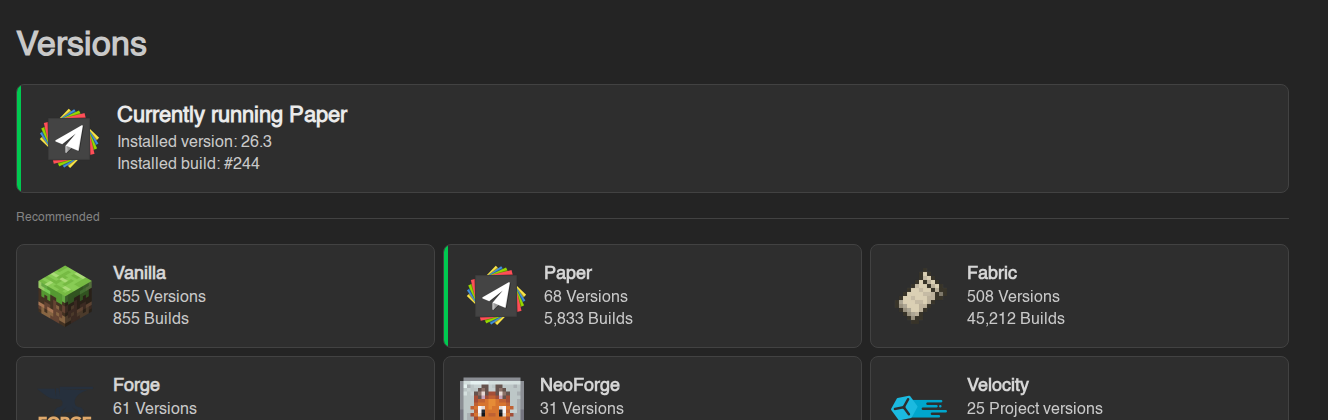
At the top you see what the panel found on your server right now: Currently running Paper, the Installed version and the Installed build. The panel works this out from the server file itself, so it's correct even if you changed things by hand.
- A green edge means you're on the latest build of that version.
- A yellow edge and a warning (Your server is currently running an outdated version of Paper 1.21.11. The latest build is #132.) means there's a newer build. Click View Versions to jump straight to the list for your server software.
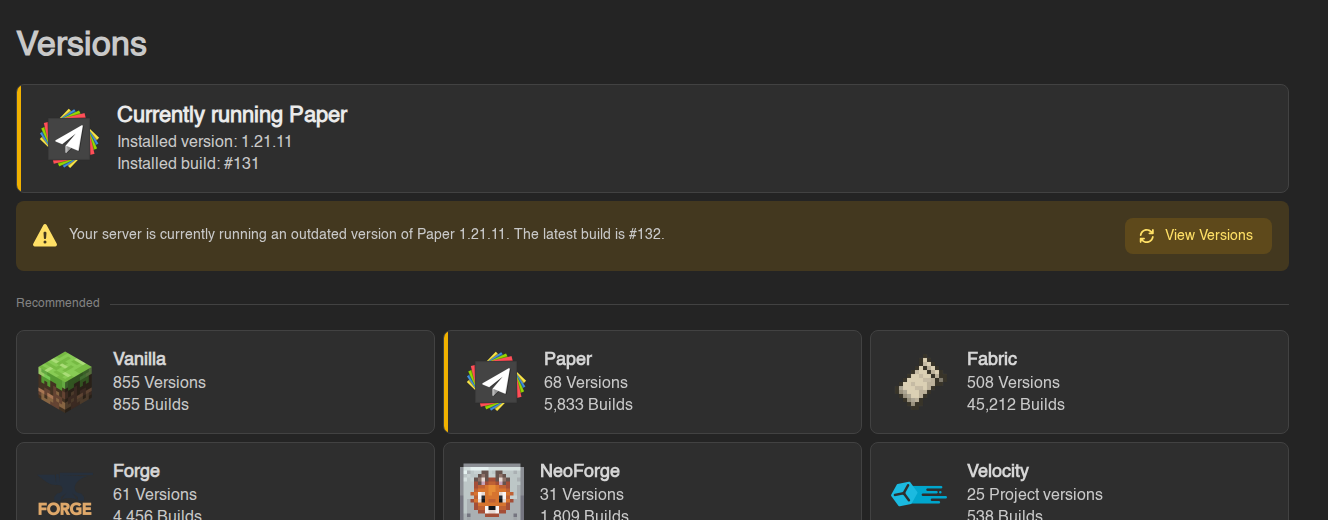
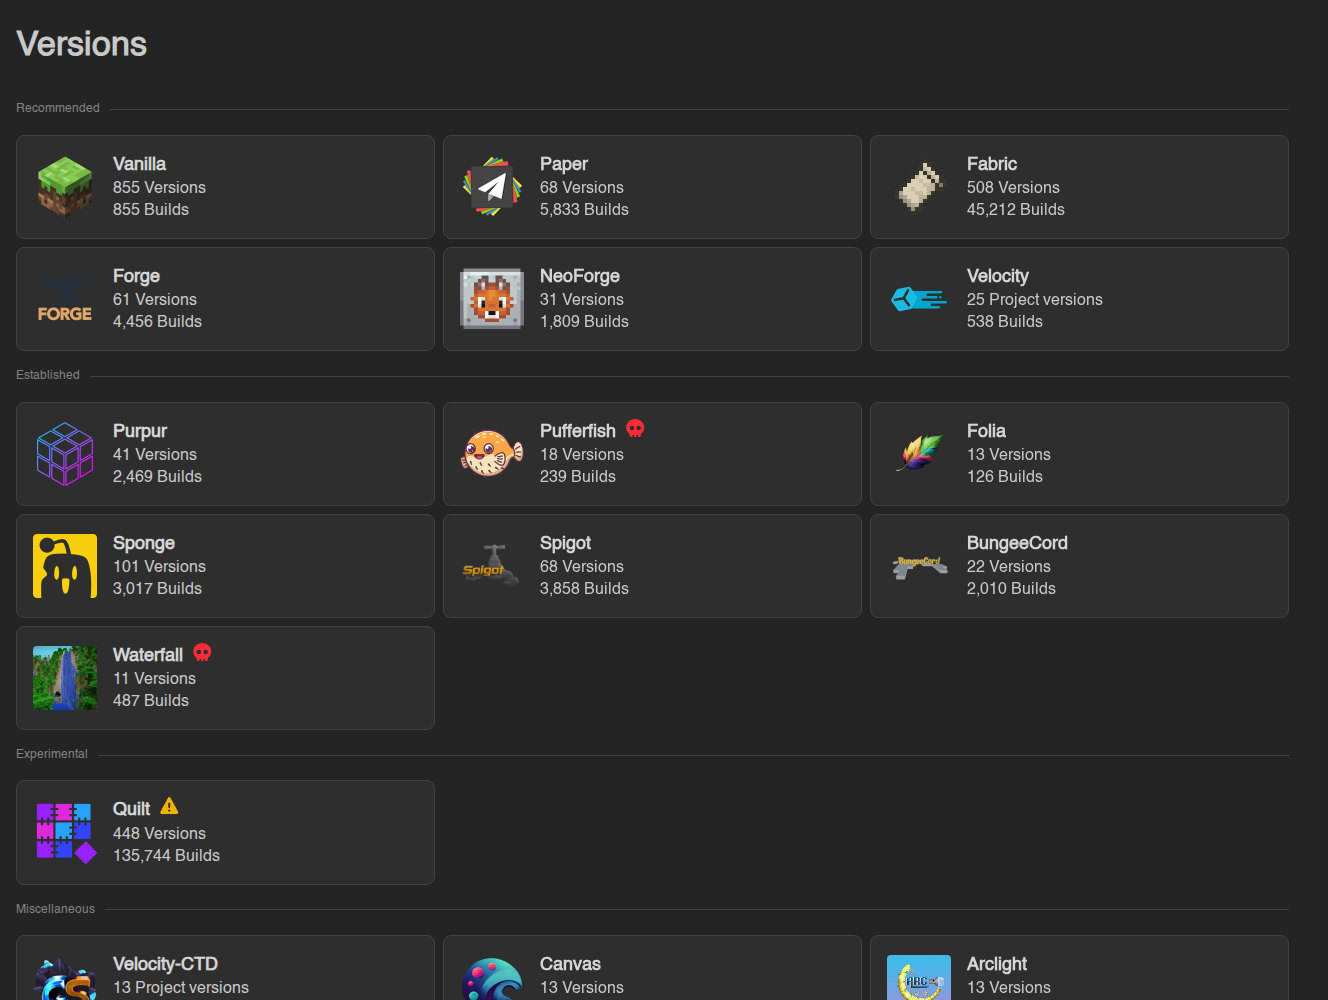
Below that are the server types you can install, grouped into Recommended, Established, Experimental, Miscellaneous and Limbos. Each card shows how many Minecraft versions and builds are available. Two small marks to know:
| Mark | Meaning |
|---|---|
| Yellow warning triangle | Experimental software. Expect bugs; keep backups close. |
| Red skull | Deprecated. No longer maintained. Fine for an old world, not a good choice for a new one. |
If the card at the top is missing, the panel couldn't match your server file to a known build (for example a jar you uploaded yourself or renamed). You can still install any version from the list.
Installing a version
- Click the server software you want, for example Paper.
- You get the list of Minecraft versions it's available for, newest first. Use Search to find one quickly, or the page numbers at the top right. Release (blue) is a normal version. Snapshot (orange) is a pre-release, release candidate or snapshot, only for testing. The version you're on now has a coloured edge. Back returns to the list of server types.
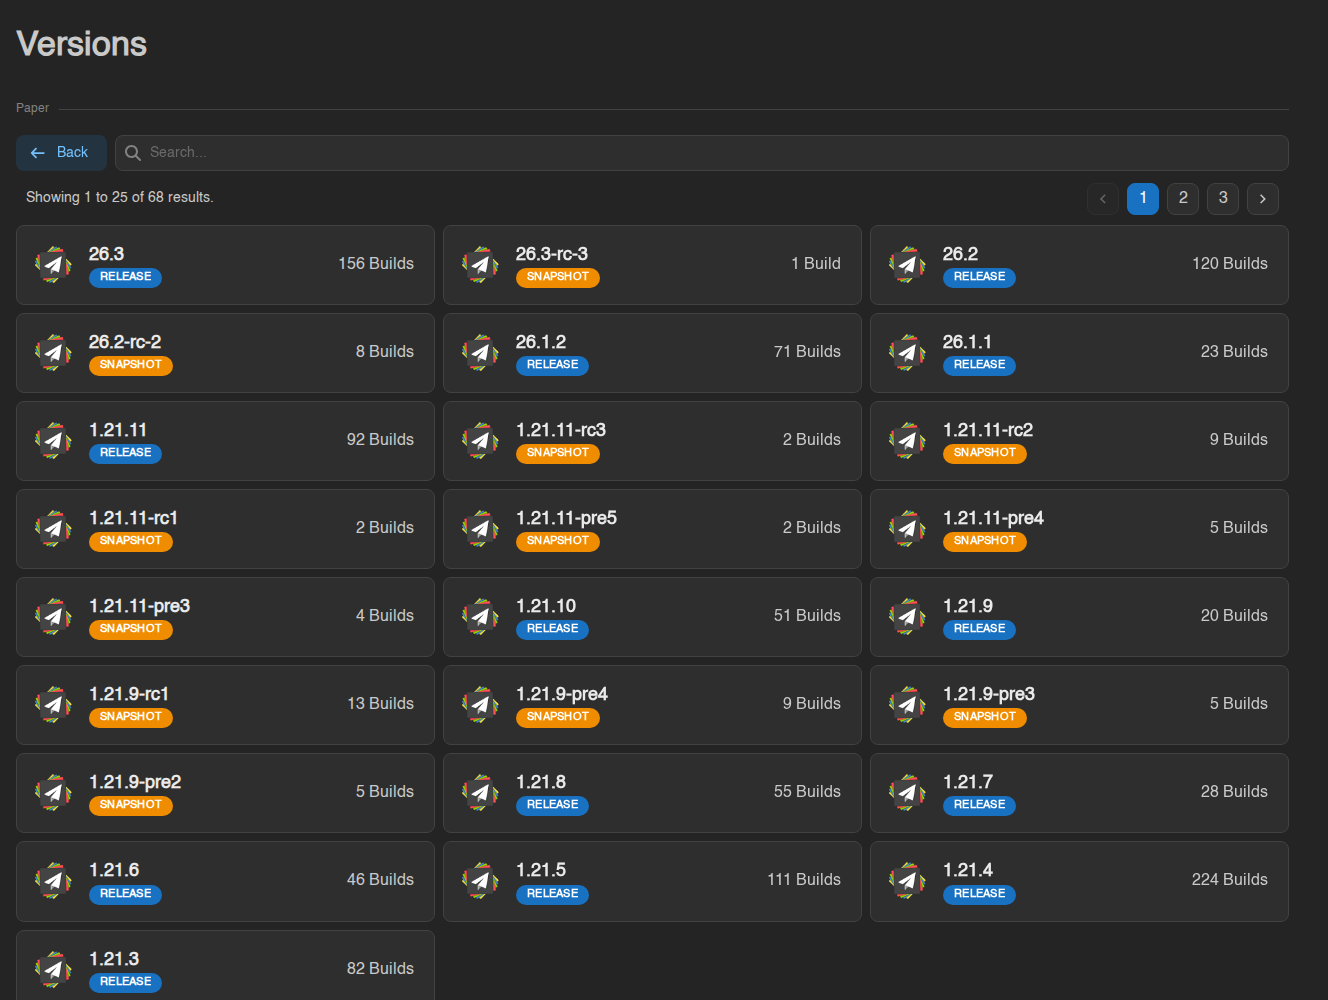
- Click the version. A window called Install Paper (1.21.11) opens.
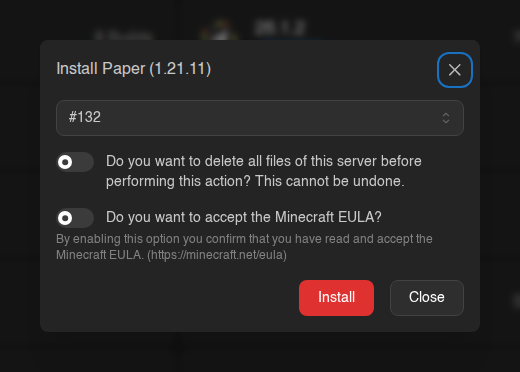
- Pick a build. The newest stable build is selected for you, and that's the right choice almost every time. Open the dropdown to pick an older build (useful when the newest one broke a plugin). Builds are grouped into Stable and Experimental; picking an experimental one shows a red warning asking you to back up first. Vanilla has only one build per version, so this dropdown isn't shown. Build names depend on the software: Paper counts #131, #132 and so on, while Forge and NeoForge show their own version numbers such as 66.1.5.
- Leave "Do you want to delete all files of this server before performing this action?" switched off. On, it wipes everything, world and plugins included, before installing. It can't be undone.
- "Do you want to accept the Minecraft EULA?": switch it on if your server has
never started before, or if you just deleted all files. It writes the
eula.txtfile a Minecraft server needs before it will start. If your server already runs, the EULA is already accepted and you can leave this off. - Click the red Install button. The download usually takes a few seconds; you get a Version installed successfully message and the card at the top updates.
- Start the server from the Console and watch the log. The first start on a new version takes longer than usual because Minecraft upgrades your world.
What Install actually changes
- The server file. The old
server.jaris replaced by the one you chose. For Forge and NeoForge the panel downloads a ready-made package (server.jarplus alibrariesfolder) and unpacks it. - The
librariesfolder is always removed first. That's a cache of helper files the server rebuilds on its next start. Nothing of yours lives in there. - The Java version. Every Minecraft version needs a particular Java (26.x needs Java 25, 1.21.x needs Java 21, 1.20.4 needs Java 17, 1.17 needs Java 16, 1.16 and older need Java 8). The panel switches your server to the matching Java automatically. You can see the result in the Docker Image box on the Startup tab. There's no separate Java picker on the Versions tab; you don't need one.
- Everything else stays. Your
worldfolders,plugins,mods,server.propertiesand configs aren't touched (unless you switched on "delete all files"). - The change is written to the Activity log.
The Startup tab is not updated. The Minecraft Version and Build Number boxes on the Startup tab (normally latest) are only used when the server is reinstalled. If you later click Reinstall Server in Settings, the installer downloads whatever the Startup tab says and puts it in place of your chosen version. Your world survives a reinstall, but you'll have to pick your version here again, or set the Startup tab to match it first.
Switching server software (Paper, Vanilla, Purpur, Fabric, Forge…)
Changing software works exactly like changing a version: pick the other type at the top level, choose the Minecraft version, click Install. Keep "delete all files" off and your world comes along. What happens to the rest depends on where you're going:
| From → To | What to expect |
|---|---|
| Paper ↔ Purpur, Folia, Spigot, Pufferfish, Leaf and other Paper forks | Drop-in. World and plugins keep working. |
| Paper → Vanilla | World keeps working. Plugins are ignored (the plugins folder stays on disk but Vanilla doesn't load it). |
| Vanilla → Paper | World keeps working. You can now add plugins. |
| Paper or Vanilla → Fabric, Forge, NeoForge, Quilt | World keeps working. Plugins don't work on these; they use mods instead, which you add to the mods folder yourself. |
| Fabric ↔ Forge/NeoForge | World keeps working, but mods are not interchangeable between loaders. |
| Hybrids (Mohist, Arclight, Youer) | Forge/NeoForge mods and Bukkit plugins side by side. Powerful, but more things can break. |
Velocity, BungeeCord, Waterfall and the Limbo servers are not game servers. They're proxies and waiting rooms for people running networks of several servers. Installing one on your game server replaces it with something players can't play on. Only pick them if you know you need them.
Switching software for good? Use Change Game on the billing site instead. The Versions tab can put Fabric or Forge files on a Paper server, but the billing site and the panel's Reinstall Server button still treat it as a Paper server, so a reinstall or a support change puts Paper back. Change Game (see Changing game) switches the whole server over properly, with the right Startup settings. Use this tab to try other software or to move between Paper and its forks; use Change Game to move to a different family (Fabric, Forge, NeoForge, Vanilla).
Going back to an older version
You can install an older version from the same list. The catch is your world: once it has been opened by a newer Minecraft, the older version won't load it (the server stops with an error about the world being too new). To really go back, install the older version here and then restore the backup you took before upgrading.
Going back to an older build of the same version (say Paper 1.21.11 #131 after #132 gave you trouble) is harmless. Just pick it in the build dropdown.
Something went wrong?
- "Version installed successfully" but the server won't start. Open the Console
and read the last lines. The usual causes are a plugin or mod made for another
version (remove it from
pluginsormodswith the file manager), a world that is newer than the version you installed (restore your backup), or the EULA not accepted yet (switch the EULA option on and install again, or editeula.txt). More in My server won't start or keeps crashing. - The list is empty or Install shows an error. The version catalogue comes from an outside service (MCJars). Wait a minute and try again. If it keeps failing, open a ticket.
- Your version doesn't show up in the card at the top. The panel needs a few seconds after installing; reload the page. If it still shows the old version, check the server was stopped during the install and try once more.
Server icon, MOTD and basic settings
What this is about
When someone adds your server to their Minecraft multiplayer list, they see three things: the name they typed, your server icon and your MOTD (the short "message of the day" under the name). Both are set on the Settings tab of your server, in the Minecraft Customization card at the bottom of the page. The card shows a live preview of how the entry will look in the game.
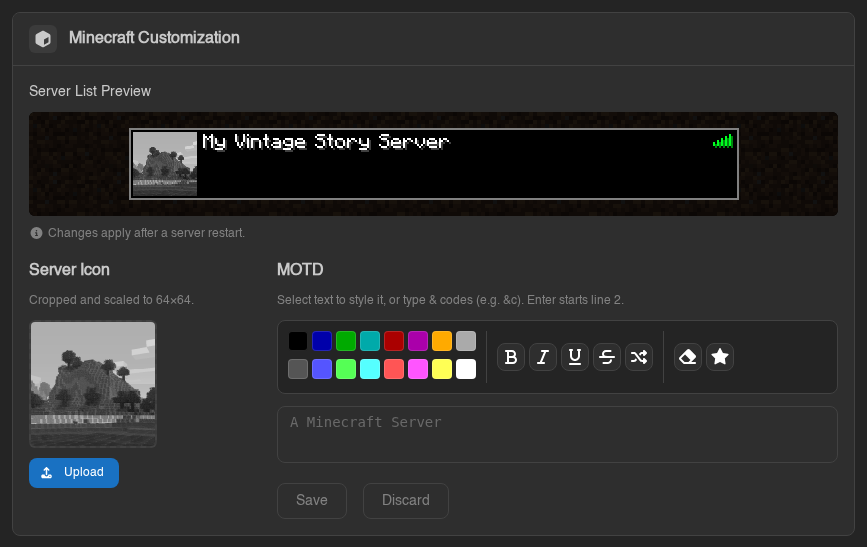
The card only appears on Minecraft Java Edition servers (Paper, Vanilla, Purpur and the like). If your server runs another game, it isn't there. The other cards on the Settings tab are explained in Server settings.
Changes apply after a server restart. Minecraft reads the icon and the MOTD when it starts. Save your changes, then Restart the server from the Console. Until then players keep seeing the old icon and message.
Server List Preview
The dark bar at the top of the card is drawn the same way the game draws the multiplayer screen, with the real Minecraft font: icon on the left, name on the first line, your MOTD on the two lines under it. It updates while you type, so you can try things before you save.
Two things to know about the preview:
- The name shown is your Server Name from the Rename Server card. In the game, players see whatever name they typed when they added your server. Only the icon and the MOTD come from your server.
- Each MOTD line is cut off at the width of the entry, roughly 45 characters in the normal font. Keep your lines short.
Server Icon
The icon is a 64 by 64 pixel PNG file called server-icon.png in your server's
main folder. Minecraft ignores icons of any other size, so the panel crops and
scales whatever you give it to exactly 64 by 64 for you.
- Click Upload (or click the square, or drag a picture onto it). Any common picture format works: PNG, JPG, GIF, WebP.
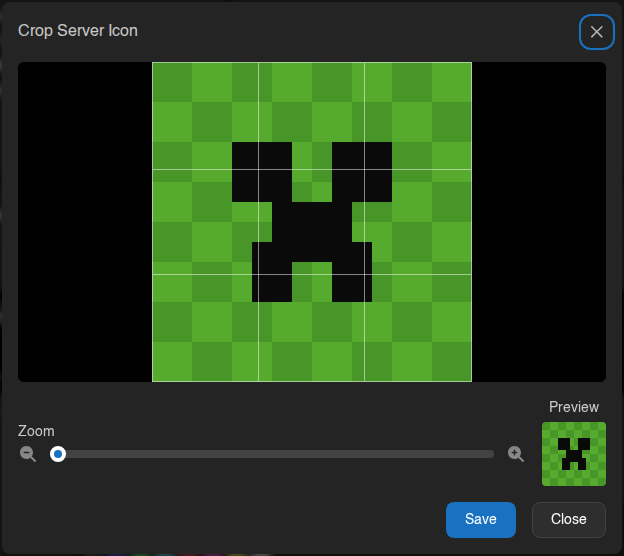
- The Crop Server Icon window opens. Drag the picture to choose the part you want to keep and use the Zoom slider (1x to 8x) to zoom in. The Preview on the right shows the finished 64 by 64 icon at its real size.
- Click Save. The icon is written to your server as
server-icon.pngand the preview updates.
Tips for a good icon:
- Simple shapes and big details work best. At 64 by 64 pixels, fine text turns into mush.
- Transparent PNGs stay transparent.
- You already have a finished 64 by 64 PNG? Upload it as is; the crop window will show the whole picture selected and the panel keeps it pixel for pixel.
To go back to the default (the grey "unknown server" picture), click Remove
next to the Upload button and confirm. This deletes server-icon.png from
your server.
MOTD
The MOTD is the text under your server's name in the player's server list. It can be up to two lines and uses Minecraft's colour and formatting codes. The editor does the codes for you:
- Type your text in the box. Press Enter once to start the second line (the editor won't let you add a third).
- Select a word or a whole line and click a colour in the palette, or B, I, U, S for bold, italic, underline and strikethrough. The shuffle button is Minecraft's "obfuscated" style (constantly changing random characters).
- The eraser button (Reset formatting) puts the selected text back to plain, and the star button (Insert symbol) drops in symbols such as ★ ❤ ⚔ ▶ that the Minecraft font can display.
- Check the preview, then click Save. Discard throws away unsaved changes.
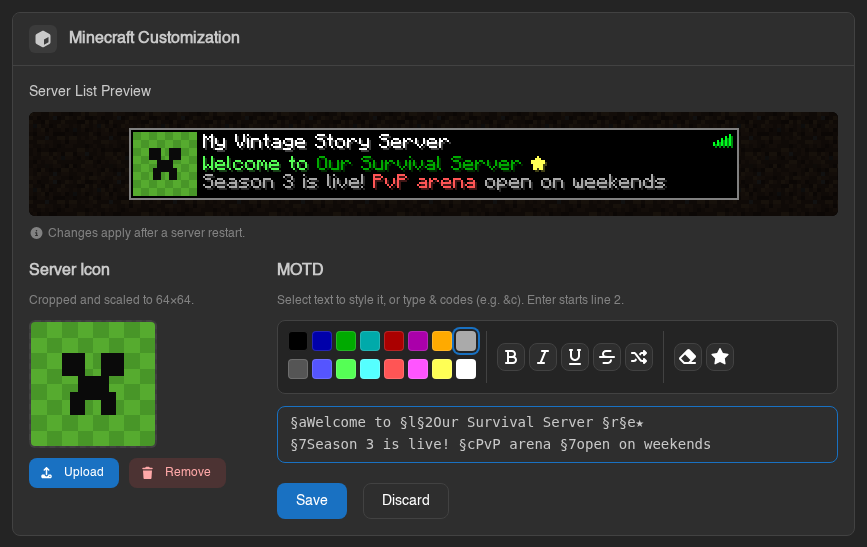
If you'd rather type the codes yourself, use & followed by the code, for
example &a for green or &l for bold. The editor turns them into the §
codes Minecraft expects as you type. Text without a colour code shows up grey
in the server list, like the game's default "A Minecraft Server".
| Code | Colour | Code | Colour |
|---|---|---|---|
&0 |
Black | &8 |
Dark Gray |
&1 |
Dark Blue | &9 |
Blue |
&2 |
Dark Green | &a |
Green |
&3 |
Dark Aqua | &b |
Aqua |
&4 |
Dark Red | &c |
Red |
&5 |
Dark Purple | &d |
Light Purple |
&6 |
Gold | &e |
Yellow |
&7 |
Gray | &f |
White |
Formatting: &l bold, &o italic, &n underline, &m strikethrough, &k obfuscated, &r reset everything.
A colour code also switches bold, italic and the other styles off. Put the colour first and the style after it (&2&l, not &l&2). When you use the toolbar on selected text this is handled for you.
The MOTD is stored as the motd= line in server.properties. The panel keeps
the rest of that file exactly as it is, and writes special characters in a form
that every Minecraft server version reads correctly. On a brand new server
without a server.properties yet, the card tells you that saving will create
the file. The limit is 512 characters including the codes.
Other settings, such as max players, difficulty or PvP
This card only covers the icon and the MOTD. Everything else in
server.properties (max-players, difficulty, gamemode, pvp,
online-mode, view-distance and so on) is edited by opening the file in the
file manager
on the Files tab. Those changes also need a restart. The Minecraft version
and the server type are set on the Startup tab,
not in server.properties.
Sharing the server with friends
Subusers see this card when they have Files → read content. They need Files → update to save a MOTD or upload an icon, and Files → delete to remove the icon.
Managing players, whitelist, ops and bans (Players)
What this is about
The Players page is where you look after the people on your Minecraft server: who is online, who has played before, and who is allowed in. From here you can whitelist, op, ban and kick players, and open any player to see their inventory, stats and advancements, all without typing console commands.
You find it in the sidebar of your server, under Players.
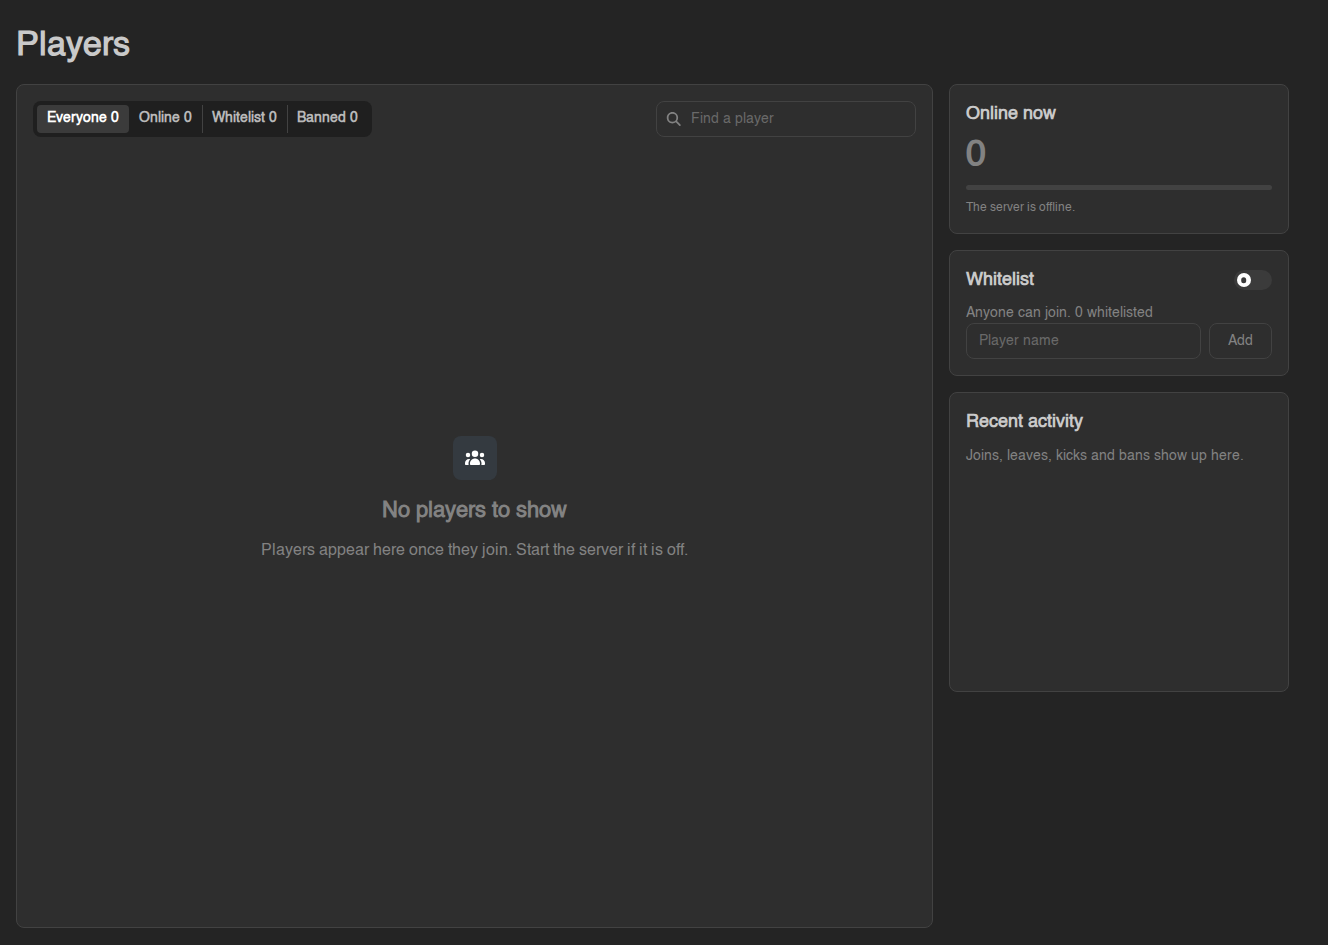
Most of the page works while the server is off, because the panel reads
and edits your server's own files (whitelist.json, ops.json,
banned-players.json and the saved player data). A few things, like kicking
or messaging, only work when the player is actually online.
The player list
The big card on the left lists everyone the panel knows about. A player shows up here when:
- they have joined your server at least once (the server saved data for them), or
- they are on the whitelist, are an operator, or are banned, or
- they are online right now.
Every row shows the player's head, name, UUID and badges:
| Badge | Meaning |
|---|---|
| Online | Playing on your server right now |
| OP | Operator: can use admin commands in game |
| Whitelisted | On the whitelist |
| Banned | Banned from the server |
Offline players also show when they were last seen (the time their player data was last saved).
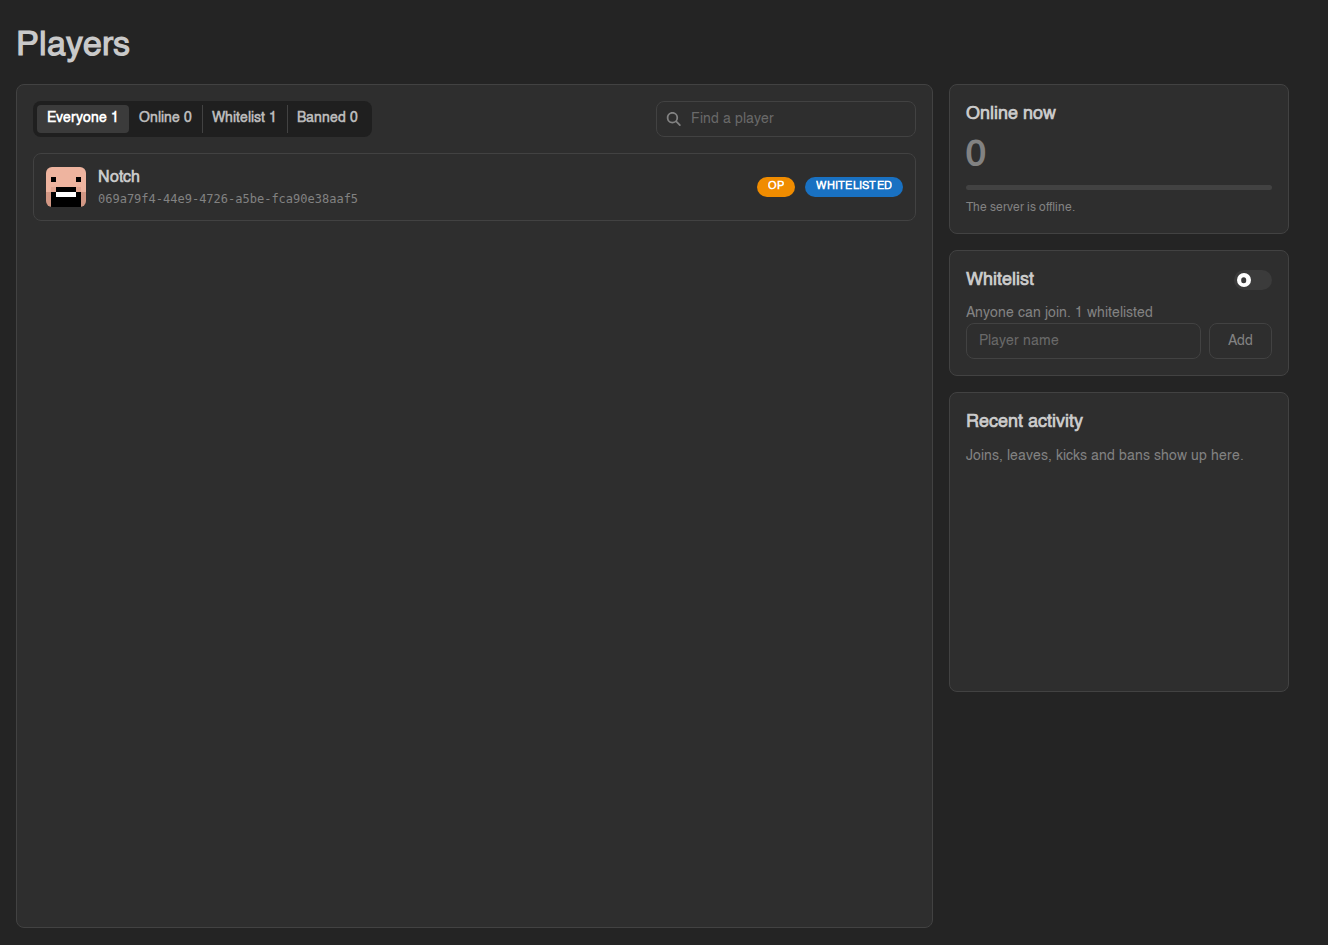
Use the tabs Everyone, Online, Whitelist and Banned to filter the list; the number next to each tab is a count. Find a player searches by name or UUID. Operators and online players are sorted to the top, and the list shows 10 players per page. It refreshes on its own every 15 seconds.
Click a row to open that player's page (see below).
On a brand new server the list is empty and shows No players to show. That is normal: players appear once they have joined, or once you add them to the whitelist.
Online now
The Online now card shows how many players are on the server and how many
slots it has (of N slots comes from max-players in server.properties).
While the server is off it says The server is offline.
When the server is running, the panel asks the server itself for the player list. The small line under the bar tells you how it got the answer:
- Read with the server list ping. The same information the in-game server list shows. Only some servers name every online player this way.
- Read with the query protocol. The full list of names. This needs
enable-query=trueinserver.properties.
If the panel can count the players but not name all of them, a yellow notice
appears at the top of the list with a Turn on query button. Clicking it
sets enable-query=true and the matching query.port in server.properties
for you. Restart the server afterwards to apply it.
Whitelist
A whitelist means only the players you list can join. The Whitelist card has two parts:
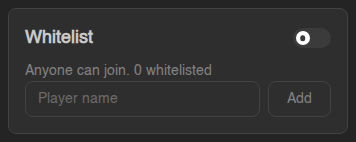
- The switch in the corner turns the whitelist on or off for the whole
server. The text below tells you the current state: Only whitelisted
players can join or Anyone can join, plus how many names are on it.
While the server runs this sends
whitelist on/whitelist off; while it is off, the panel changeswhite-listinserver.propertiesinstead. - To add someone, type their Player name and click Add. You get a green … added to the whitelist message and the player appears in the list with a Whitelisted badge.
Names are checked against Mojang when the server is off (on a normal online-mode=true server). If you see no Minecraft account has that name, check the spelling: the name has to be the player's exact Minecraft account name. Names can only contain letters, numbers, underscores and dots.
To remove a player from the whitelist, open their page and switch Whitelisted off in the Control card.
Recent activity
The Recent activity card lists the last joins, leaves, kicks and bans from your server log (up to 25). It fills in once players have been on the server.
A player's page
Click any player to open their page. It shows:
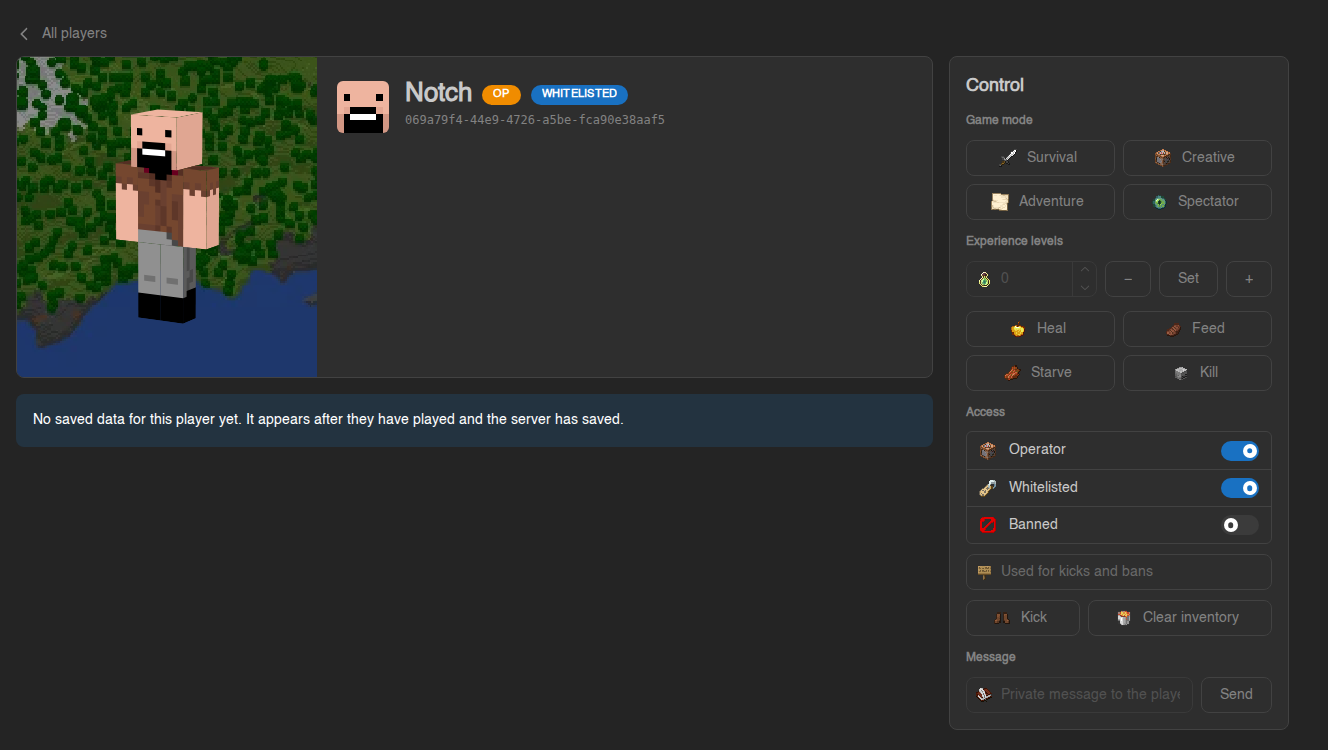
- Their skin on the left, with name, badges and UUID (click the UUID to copy it). If a player is banned, the ban reason shows here too.
- Facts about them: Mode (game mode), Dimension, Position, Total XP, Play time, Sessions, Since last death and First joined. Each one only shows when the server has saved that information.
- Their health, food and armor bars, and tabs for Inventory, Ender chest and Map (a map of the area around where they last were).
- An Advancements card with what they have completed and what is in progress.
What you see is the last save of that player. Online players are saved every few minutes; click Save now (only shown while the server runs) to save the world and refresh the page straight away.
A player who has been whitelisted, opped or banned but never joined has no saved data yet. Their page says No saved data for this player yet and only shows the Control card. The stats and inventory appear after they have played and the server has saved.
The Control card
On the right of a player's page is the Control card. This is where you manage the player.
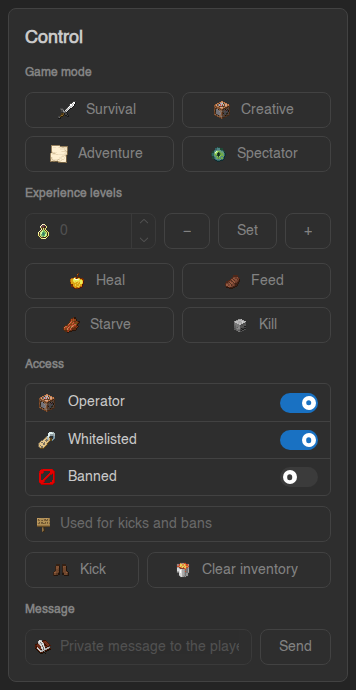
Access: Operator, Whitelisted, Banned
The three switches under Access give or take away access:
| Switch | What it does |
|---|---|
| Operator | Makes the player an operator (full admin rights in game, OP level 4). Only give this to people you trust. |
| Whitelisted | Adds or removes them from the whitelist. |
| Banned | Bans them from the server, or lifts the ban. Type a reason in the Used for kicks and bans field first if you want one; otherwise the reason is "Banned by an operator." A ban from here never expires. |
These three work whether the server is on or off. When it runs, the panel
sends the normal op, whitelist, ban and pardon commands. When it is
off, the panel edits ops.json, whitelist.json and banned-players.json
directly, so the change is there the next time you start.
Kick
Kick removes the player from the server right now, with the text in the Used for kicks and bans field as the reason. They can join again immediately. This only works while the player is online.
Game mode, experience, heal, feed, starve, kill, clear inventory
- Survival / Creative / Adventure / Spectator sets the player's game mode.
- Experience levels: type a number and click Set to set their level, or use − and + to take away or add that many levels.
- Heal fills their health, Feed fills their food bar.
- Starve empties their food bar and Kill kills them.
- Clear inventory removes everything they carry. You are asked to confirm, because this cannot be undone.
When the player is online, these run as game commands and happen immediately. Game mode, experience, heal, feed and clear inventory also work while the player is offline: the panel then writes the change into their saved player data, and they see it when they next join. Starve and Kill need the player online, so they are greyed out otherwise.
Message
Type a Private message to the player and click Send. It uses the
in-game tell command, so the player has to be online.
What needs the server running?
| Action | Server off | Server on, player offline | Player online |
|---|---|---|---|
| Whitelist on/off, add or remove a player | Yes | Yes | Yes |
| Operator on/off | Yes | Yes | Yes |
| Ban / unban | Yes | Yes | Yes |
| Game mode, experience, heal, feed, clear inventory | Yes (needs saved data) | Yes (needs saved data) | Yes |
| Kick, kill, starve, message | No | No | Yes |
| Save now | No | Yes | Yes |
"Needs saved data" means the player has to have joined at least once. For a player who never joined, you get this player has no saved data yet.
Common questions
A row says "Unknown player". The panel found saved data for a UUID but no
name for it (the server keeps names in usercache.json). The player's name
fills in the next time they join. Until then no command can target them.
I whitelisted someone, but they still can't join. Check that the
Whitelist switch is on and that the name is spelled exactly like their
Minecraft account. Players on a server with online-mode=false (cracked or
behind a proxy) have a different UUID than on an online-mode server, so the
whitelist entry only matches the mode the server is actually in.
Can my friends use this page? Yes, if you give them the Player Manager permissions when you share your server (subusers). View also needs the files "read content" permission; Manage also needs console access while the server runs, or file editing while it is off. Everything done here is recorded in the Activity log.
Bedrock servers. The page works for Bedrock too, with a few differences: the whitelist is Bedrock's allowlist, there is no Banned tab or switch (Bedrock has no ban list), and making someone an operator needs their Xbox ID, which the server only learns once they have joined.
Proxies (Velocity, BungeeCord). A proxy has no whitelist or player files of its own, so only the online players can be listed. Manage players on the servers behind the proxy instead.
You can still do all of this the old way in the Console
with commands like whitelist add Name, op Name or ban Name. The Players
page picks those changes up too.
Installing a modpack (Modpacks)
What this is about
A modpack is a ready-made bundle of mods, configs and a mod loader (Forge, NeoForge, Fabric and so on) that turns Minecraft into a different game: All the Mods, Cobblemon, SkyFactory, RLCraft and thousands more. The Modpacks tab in the sidebar lets you search the big modpack sites and install a pack on your server with one click. The panel downloads the pack's server files and sets up the loader for you. You don't need to upload anything.
Installing a modpack replaces the server software you have now. Your old server jar, mods and libraries are removed and the pack's files take their place. Your world is kept unless you tick the "delete all files" switch, but a different pack (or even a newer version of the same pack) can corrupt a world made with another one. Take a backup first.
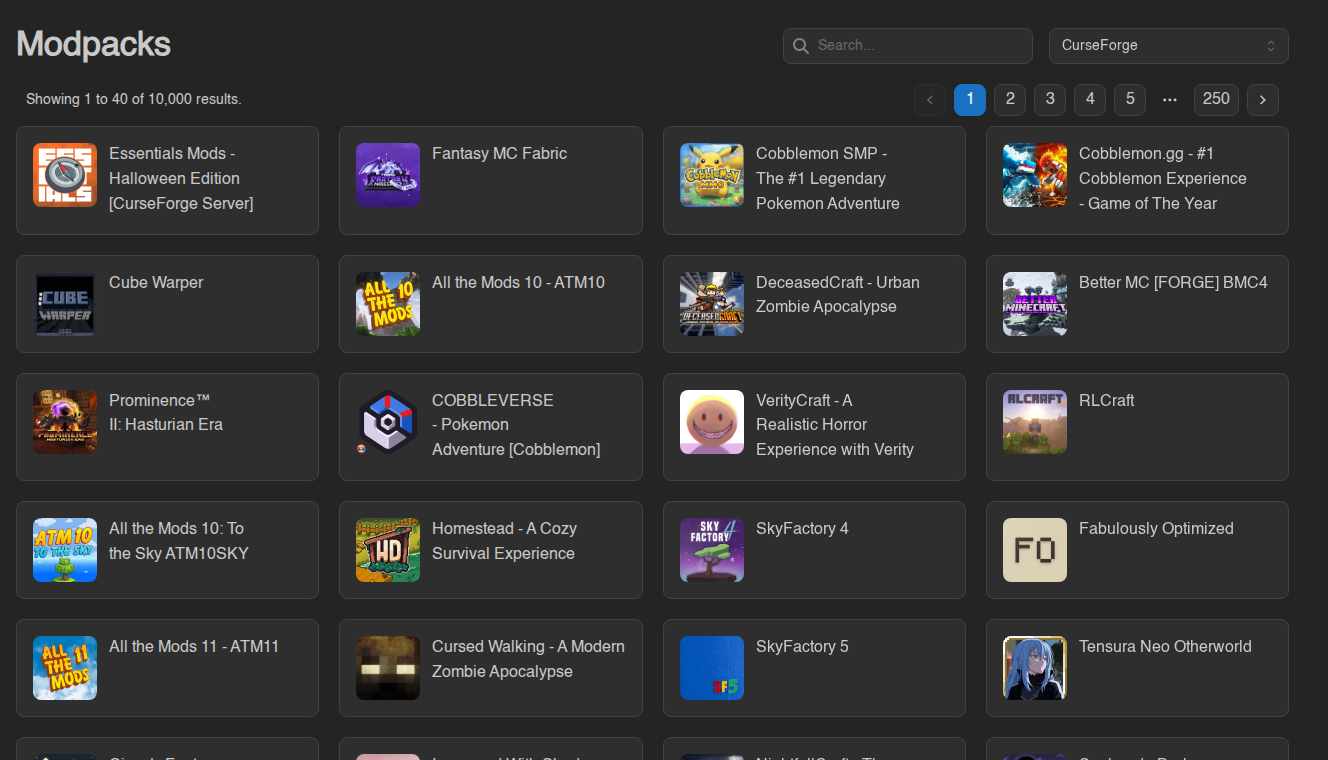
Where the packs come from
The dropdown at the top right picks which site to search. CurseForge is selected by default.
| Source | Good for |
|---|---|
| CurseForge | The largest library. Most well-known packs (All the Mods, SkyFactory, RLCraft, Cobblemon packs) live here. |
| Modrinth | Open modding site, many Fabric and Quilt packs. Only packs that work on a server are listed. |
| ATLauncher | Packs from the ATLauncher launcher |
| Feed The Beast | The official FTB packs (FTB Skies, FTB Evolution and so on) |
| Technic | Packs from the Technic launcher (Tekkit and friends) |
| Voidswrath | Packs from the Voids Wrath launcher |
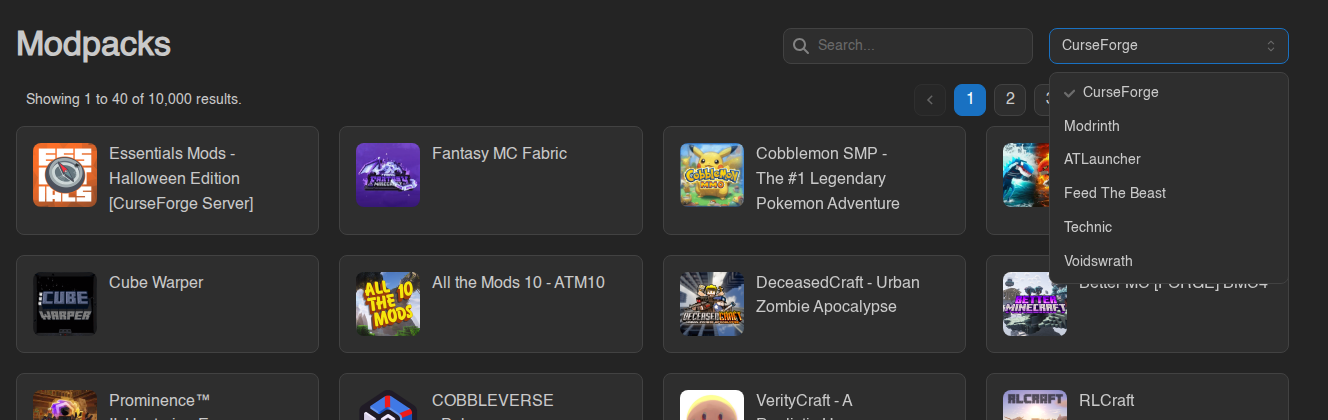
Type a name into Search... and the list updates as you type. Results come in pages of 40; use the page numbers to go further. Each card shows the pack's icon and name. Click a card to see its description and versions.
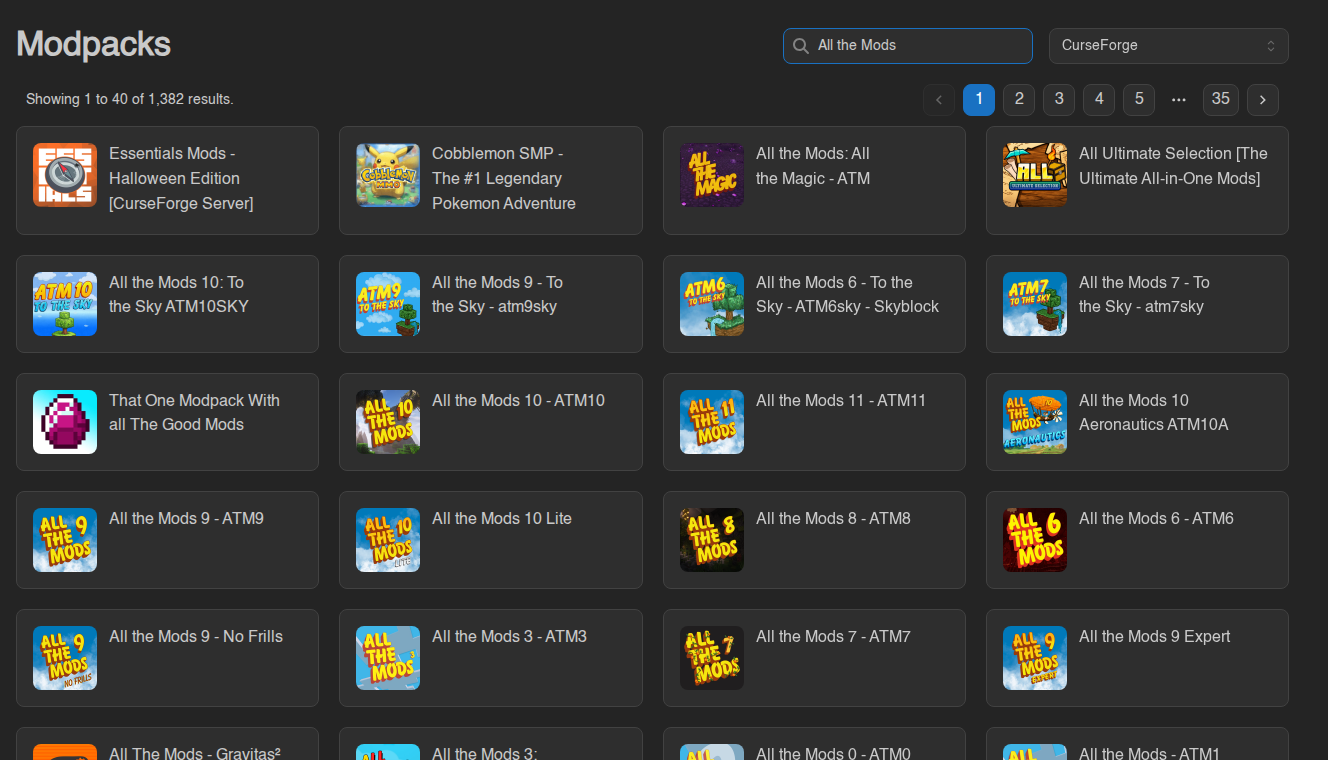
Can't find a pack? Check the dropdown. A pack is usually only on one of the sites, so try the one its creators use. If a search returns no results at all on every site, the site may be down or slow; try again in a minute.
Installing a modpack
- Stop your server (Console tab) and tell your players. Installing stops the server anyway, but a clean stop saves your world properly first.
- Make a backup on the Backups tab, especially if you already have a world you care about.
- Open the Modpacks tab, pick the source, search for the pack and click its card.
- In the Install … window:
- View modpack on CurseForge (or whichever site) opens the pack's page in a new tab, where you can read the requirements and the recommended amount of RAM.
- The version dropdown lists every release of the pack, newest first. The newest one is pre-selected. Pick the version your players will be using. The server and every player's client must run the same pack version.
- "Do you want to delete all files of this server before performing this action?": leave it off to keep your world,
server.properties, whitelist and ops. Switch it on for a completely fresh server. This deletes everything, including your world, and can't be undone.
- Click the red Install button. Cancel closes the window without changing anything.
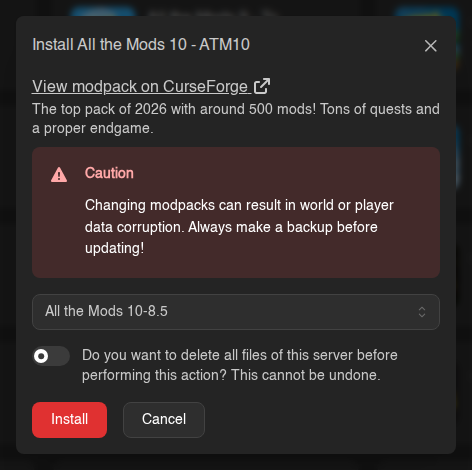
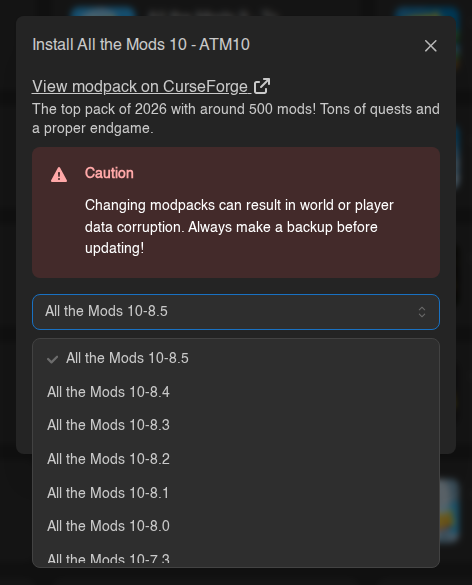
After you click Install the panel takes you to the Console. The server shows Installing with a progress bar, and you can't start it until the install is done. Big packs download hundreds of mods, so this can take several minutes. When the console says Installation has completed successfully. you're ready to go. If you need to abort, the Cancel button next to the progress bar stops the install.
What installing actually does
It helps to know what happens behind the scenes:
- Your server is stopped if it's running (it's force-stopped after 30 seconds if it doesn't react).
- If you ticked the "delete all files" switch, the whole server folder is emptied first.
- The old server jar, the mods, coremods and libraries folders and the Fabric/Forge launcher files are removed. Everything else (your world, configs,
server.properties,whitelist.json,ops.json, backups) stays. - The pack's server files are downloaded from the site you chose and put in place, together with the mod loader the pack needs.
- Your server type (egg) and your Startup settings stay as they are. After the install finishes, the panel looks up which Java version the pack's Minecraft version needs and switches the Docker Image on the Startup tab to it, so you don't have to.
Because your world and your settings stay, installing a newer version of the same pack is the normal way to update it. The card at the top of the Modpacks tab reminds you which pack you installed last, and when; click it to jump straight to its version list.
Changing to a different pack on top of an existing world almost always breaks the world, because the mods that created its blocks and items are gone. For a new pack, either turn on the "delete all files" switch, or restore a backup from before you installed the first pack.
Starting it for the first time
- Go to the Console tab and click Start.
- If this is a fresh server, the panel asks you to accept the Minecraft EULA. Accept it and the server starts.
- The first start of a modpack is slow (often 2 to 5 minutes, longer for huge packs) because every mod sets itself up and the world is generated. Watch the console. It's done when you see Done (…s)! For help, type "help".
If the server stops with an out-of-memory error, or crashes before "Done", see How much RAM does a modpack need? below.
Your players need the same modpack
A modded server only accepts players who run the same mods. Each player installs the pack on their own computer with the launcher that matches the site you installed from:
| You installed from | Players use |
|---|---|
| CurseForge | The CurseForge app (or Prism Launcher with the CurseForge pack) |
| Modrinth | The Modrinth app |
| ATLauncher | ATLauncher |
| Feed The Beast | The FTB app |
| Technic | The Technic Launcher |
| Voidswrath | The Voids Wrath launcher |
Make sure everyone picks the same version of the pack you chose in the install window. Then they add your server's address from the Network tab in Multiplayer as usual. A player with the wrong version or missing mods gets a "mod rejections" or "incompatible" message when they try to join.
How much RAM does a modpack need?
Modpacks are much hungrier than a plain server. As a rule of thumb:
| Pack size | Memory |
|---|---|
| Small (under 50 mods) | 4 GB |
| Medium (50 to 150 mods) | 6 to 8 GB |
| Large kitchen-sink packs (All the Mods, Prominence and similar, 250+ mods) | 8 to 12 GB or more |
Most pack pages state a recommended amount; your server needs at least that. Your server uses the memory of your plan automatically (the startup command lets Java take up to 80% of it, and the rest is needed by the system), so there's nothing to tune in the panel. If the pack needs more than your plan has, upgrade it on the billing site, see Upgrade/Downgrading Servers. Your files and world stay as they are.
Going back to a normal server
Modpacks don't have an "uninstall" button. You have three ways back:
- Restore a backup from before the install. On the Backups tab, restore it with both options turned on (delete all files first, and restore the startup settings). That gives you the server exactly as it was, including the old Java image. See Backups: create, restore and download.
- Reinstall a plain server. On the Settings tab, use Reinstall Server with the "delete all files" switch on. The panel installs the plain server type you had before the pack (for example Paper), with a fresh world. Check the Docker Image on the Startup tab afterwards: a new Minecraft version needs the newest Java, and the modpack may have switched it to an older one.
- Switch to a different pack or server type. Install another modpack with the "delete all files" switch on, or use the Versions tab to install a plain Vanilla/Paper/Fabric jar. Remove the leftover
modsandconfigfolders yourself in the file manager if you keep the old files.
Common problems
| Problem | What to do |
|---|---|
| The install window shows no versions | The site didn't answer. Close the window and open the pack again. |
| Install fails (the panel shows Conflicting Server State: This server failed to install) | Usually the chosen pack version has no server files on that site. Click Acknowledge Failure to get your server back, then try another version. If that button isn't offered to you, open a support ticket and we'll unlock it. |
| Server crashes right after "Installing" finished | Not enough memory (see above), or a mod in the pack is client-only. Read the crash report in crash-reports/ with the file manager. |
| "Server is already installing or in an invalid state" | Another install, backup restore or transfer is still running. Wait until it finishes. |
| Players can't join: "mod rejections" / "incompatible" | Their pack version doesn't match the server's. Compare the version in the install window with their launcher. |
If you're stuck, open a ticket on the billing site and tell us the pack, the version and what the console shows, see Getting help: support tickets.